The Mindspace
Meet the Antigravity A1, possibly the most important drone of the decade
by Cody Toombs Published on Dec 4, 2025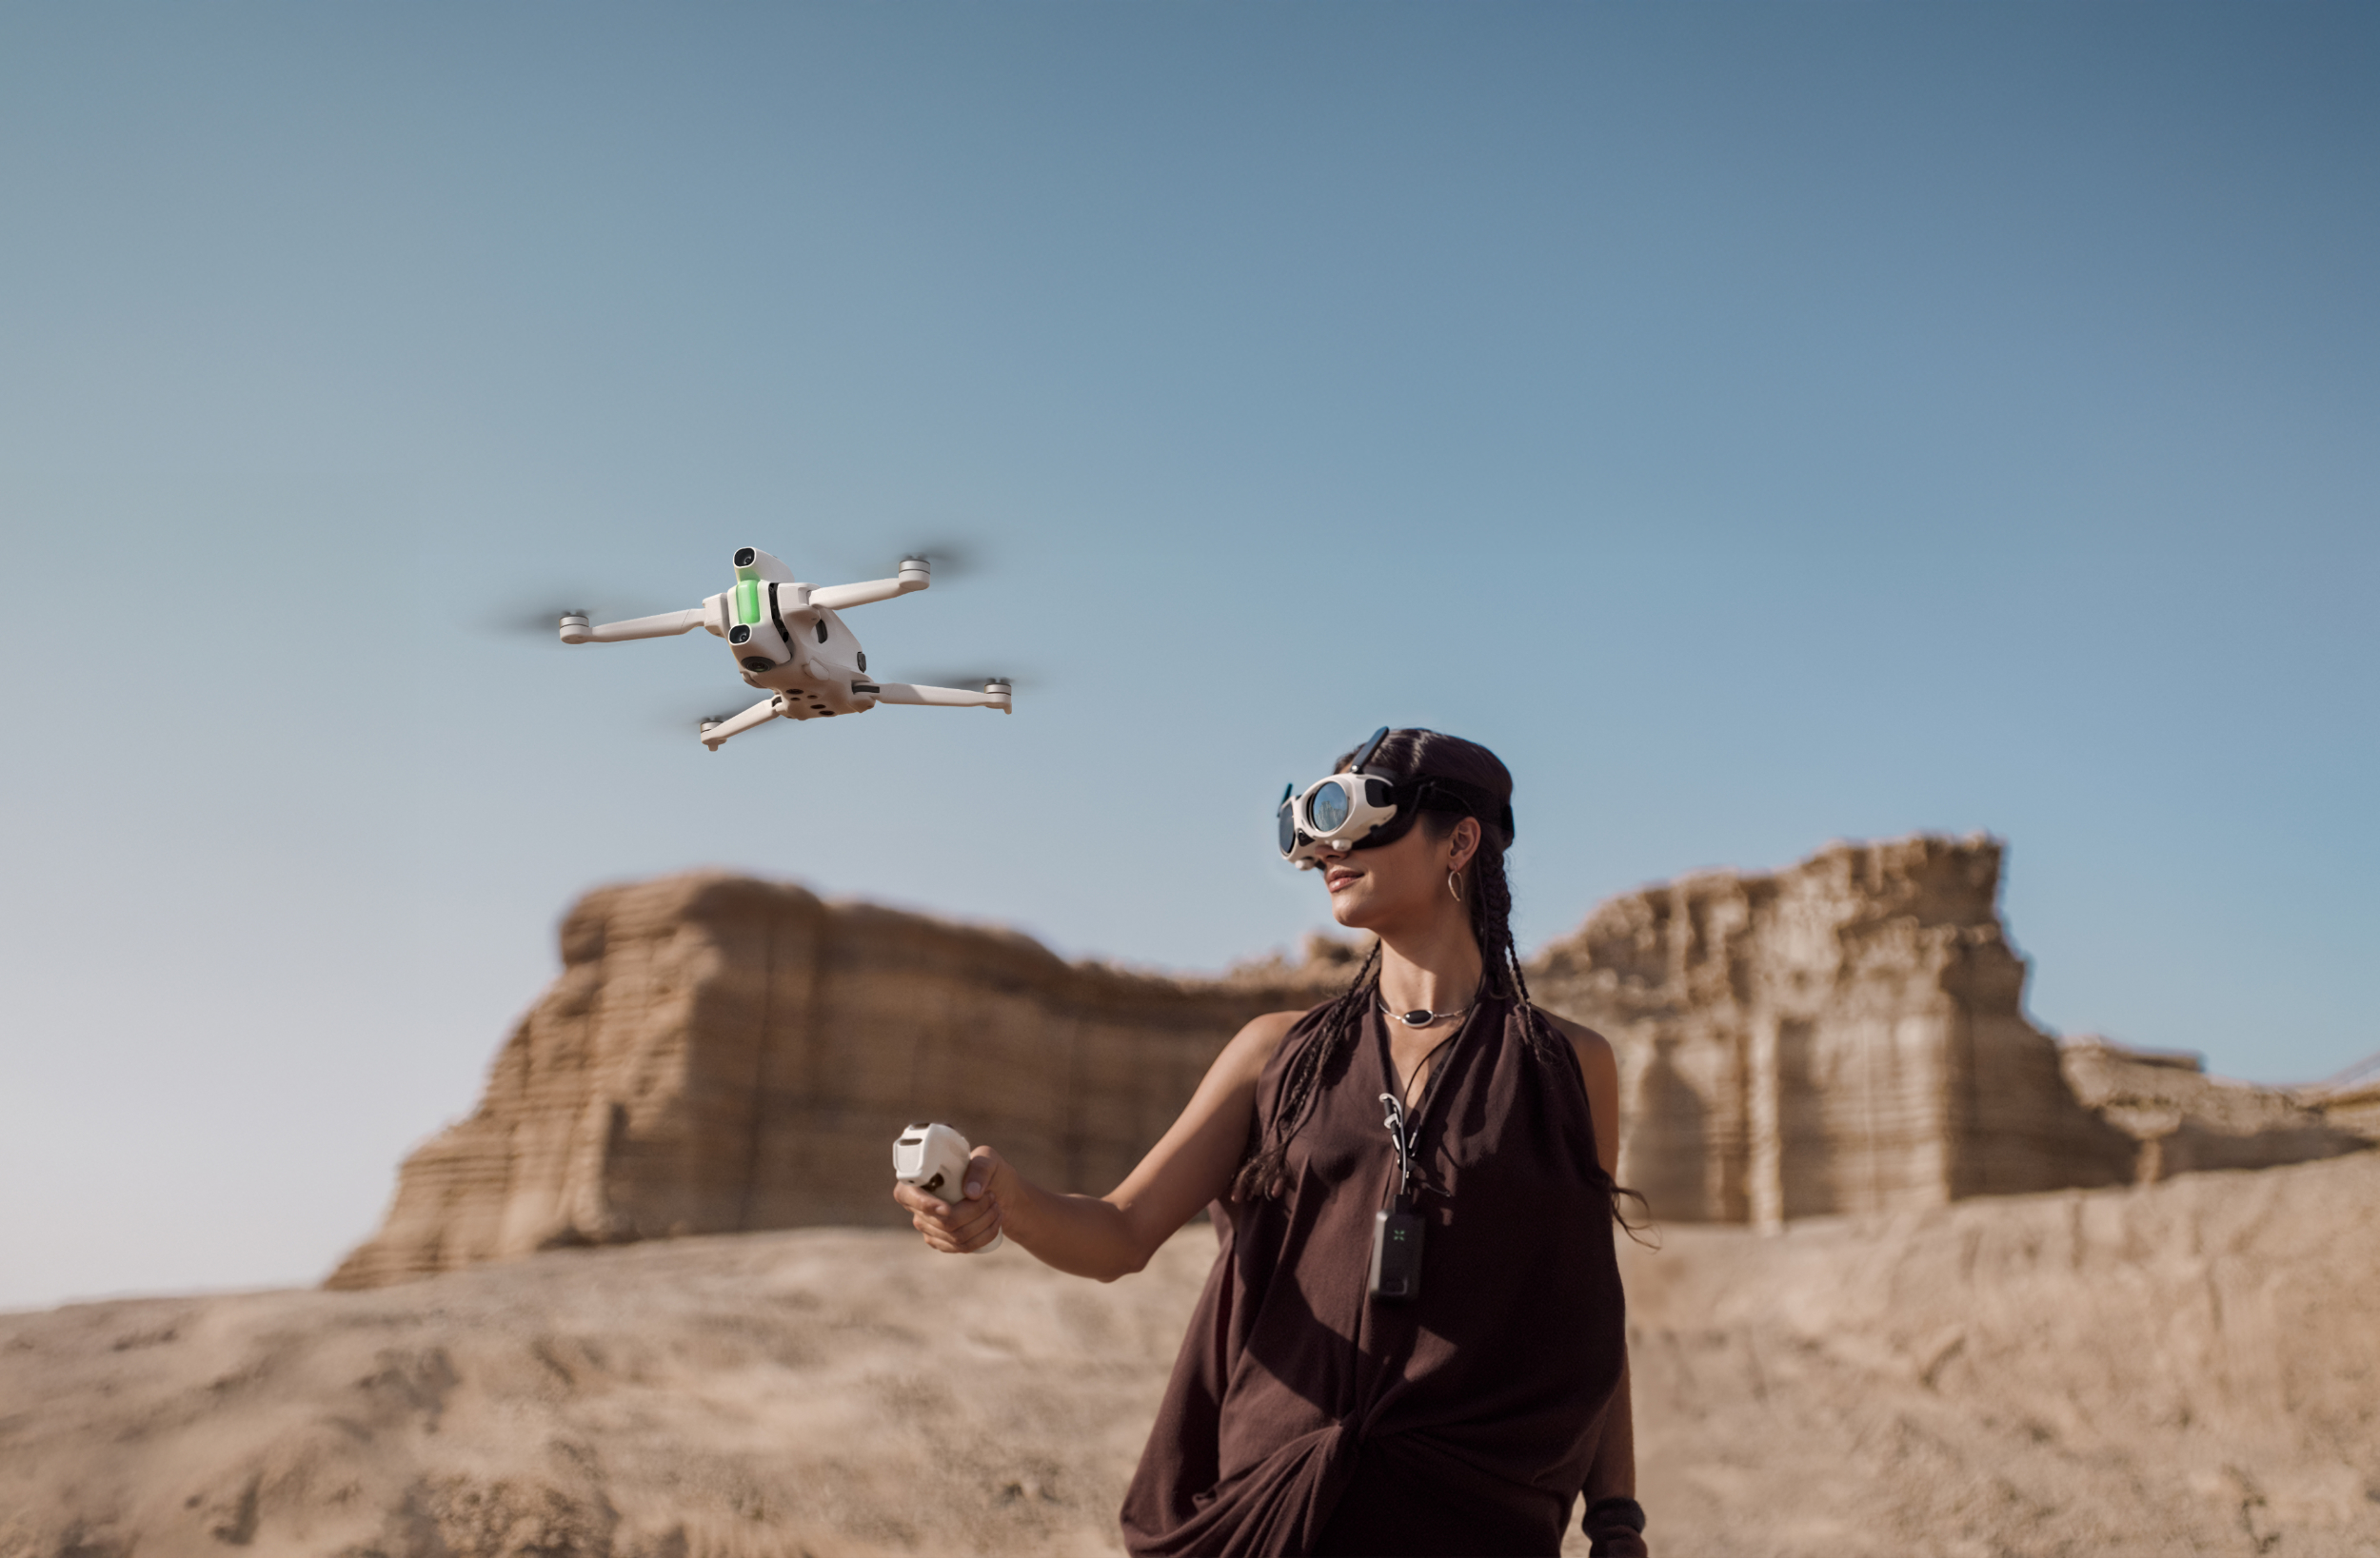
I’ve been following and writing about the drone industry for years, even before I bought my DJI Mavic 2 Zoom — yeah, I know, I should have picked up the Pro instead. In that time, I’ve watched DJI make a meteoric rise to the top of the market, largely through long battery life, surprisingly good cameras, and some fairly competitive prices.
Until now, I’ve only seen one drone manufacturer come out of the woodwork with something capable of taking a meaningful swipe at DJI. That was Skydio in 2019 with its first serious market contender, the Skydio 2. That model boasted a very advanced object avoidance and navigation algorithm, making it capable of tracking and following a subject through and around obstacles in a fluid way that far exceeded anything DJI was doing at the time. Honestly, I’m not sure even DJI’s latest and most advanced drones have quite caught up even six years later. However, Skydio ceded the consumer market to DJI and pivoted to selling drones to corporate customers for things like monitoring and inspecting industrial facilities, farms, etc.
But today, I think we’re seeing the first genuine competitor to DJI’s dominance in the consumer market: Antigravity, and its first product, the A1.
Okay, I might be overselling that a little. It may be a while before the two are truly stepping on each other's toes, but I’ll get to that in a bit.
Enter Antigravity and the A1
Antigravity might sound like a brand new company, and it technically is, but all of the press materials describe it as an “incubation” by Insta360 and other companies. I’m sure that phrasing is intended to convey much more, but everything about the product launch, including the strategy, tone, and even the editing software are all closely linked to Insta360. I don’t actually know how deeply linked they are, but it’s hard to see them as anything other than two brands under a shared roof.
Regardless, the company’s first product is pretty incredible. Just imagine taking a 360 camera and sandwiching a drone body between its two lenses. That’s the A1 in a nutshell.
Yes, that’s a pretty obvious idea that plenty of people have been asking for over the last several years, but now it’s finally a reality! This is the first consumer-oriented drone with a built-in 360 camera, an innovative flight control system, and a good workflow for generating usable video.
Reframing The World
For those that don’t already know, one of the reasons 360 cameras are so great is that they enable the ability to reframe shots in post. It’s not the only thing that makes the A1 special, but let’s start there.
Imagine using a traditional drone to record a snowboarder on their way down a mountain. If you get remotely close, even if you’re just following from behind, this requires fast reactions to control both the drone’s direction and orient it to keep the subject in view. If the person suddenly changes direction, it’s easy to lose sight of them. There are a few tricks to make it easier, but getting a great shot takes a lot of skill, planning, and some luck.
Switching to a 360 camera changes that dynamic and dramatically relaxes the bar to get difficult shots. As long as the subject is anywhere within view of the drone, they can be found in the captured footage, and it’s just a matter of using software to direct the view toward them.
Reframing doesn’t stop at just changing the angle of your viewport, it also allows for changing the focal length for your field of view, almost like zooming out on a camera lens. If you get a little too close with a traditional drone, the shot may be ruined if too much of the subject’s legs or head go out of frame, or maybe it loses whatever they’re approaching or interacting with. In post, it’s possible to change your perspective by effectively zooming out to show a wider view. Yes, that introduces some distortion that can look very silly if taken too far, but it’s a useful tool that can save some shots.
Super Power Unlocked: Checking Your Rear Views
Implanting a 360 camera into a drone is great for reframing, but that isn’t the only thing it brings to the table. If you’ve ever tried to set up fancy shots in close proximity to obstacles using traditional camera drones, or even just flying into tight or awkward places, you’ve surely come to realize it’s an absolute nightmare.
Every move fills you with an anxious dread that you could be just about to clip something with a propeller and the drone will go spiraling off in some direction where it can’t be saved from certain doom. I can’t count all of the times I’ve been flying a drone and stopped to hover for a while and spin my view to visually check surroundings I can’t see very well from the ground, just to ensure I’m not too close to a tree limb or a power line.
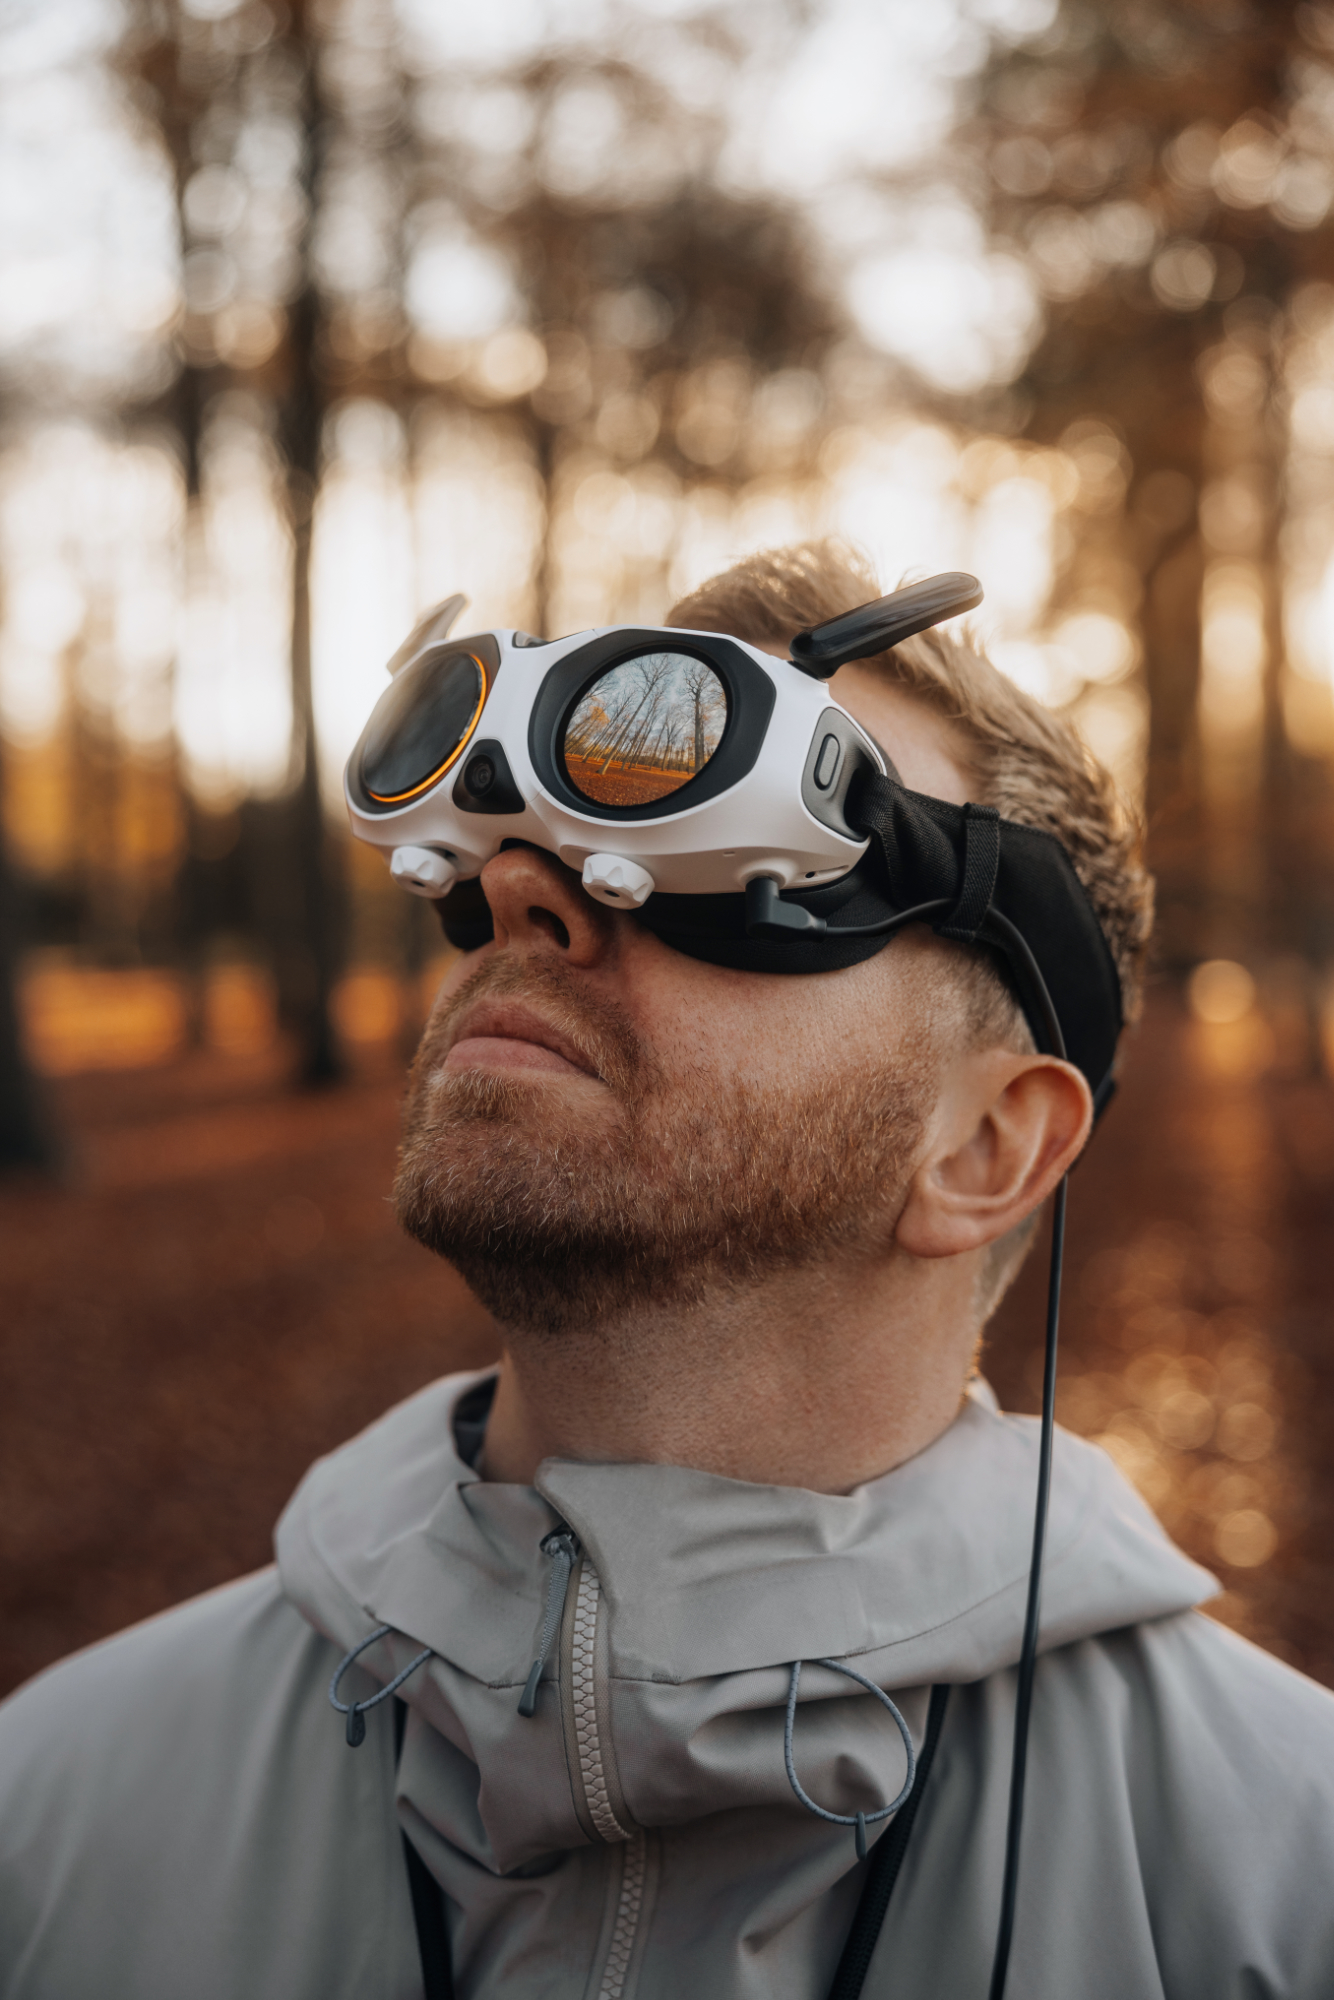
Flying with the A1 changes that experience entirely. It has goggles with built-in motion controls that translate your head’s movements across the view captured by the 360 camera. In other words, I can simply turn my head quickly in any direction to see if I’m close to anything.
Not only can that help with getting into position, it makes certain types of shots easier to pull off. The direction I’m facing has no effect on the direction the drone is traveling, so I could fly parallel to a subject and glance between it and my flight path to ensure I’m matching their pace while also avoiding obstacles. With most traditional drones, even on the very high end, this would require two independent systems and operators.
Flying Is Easier, but Weirder
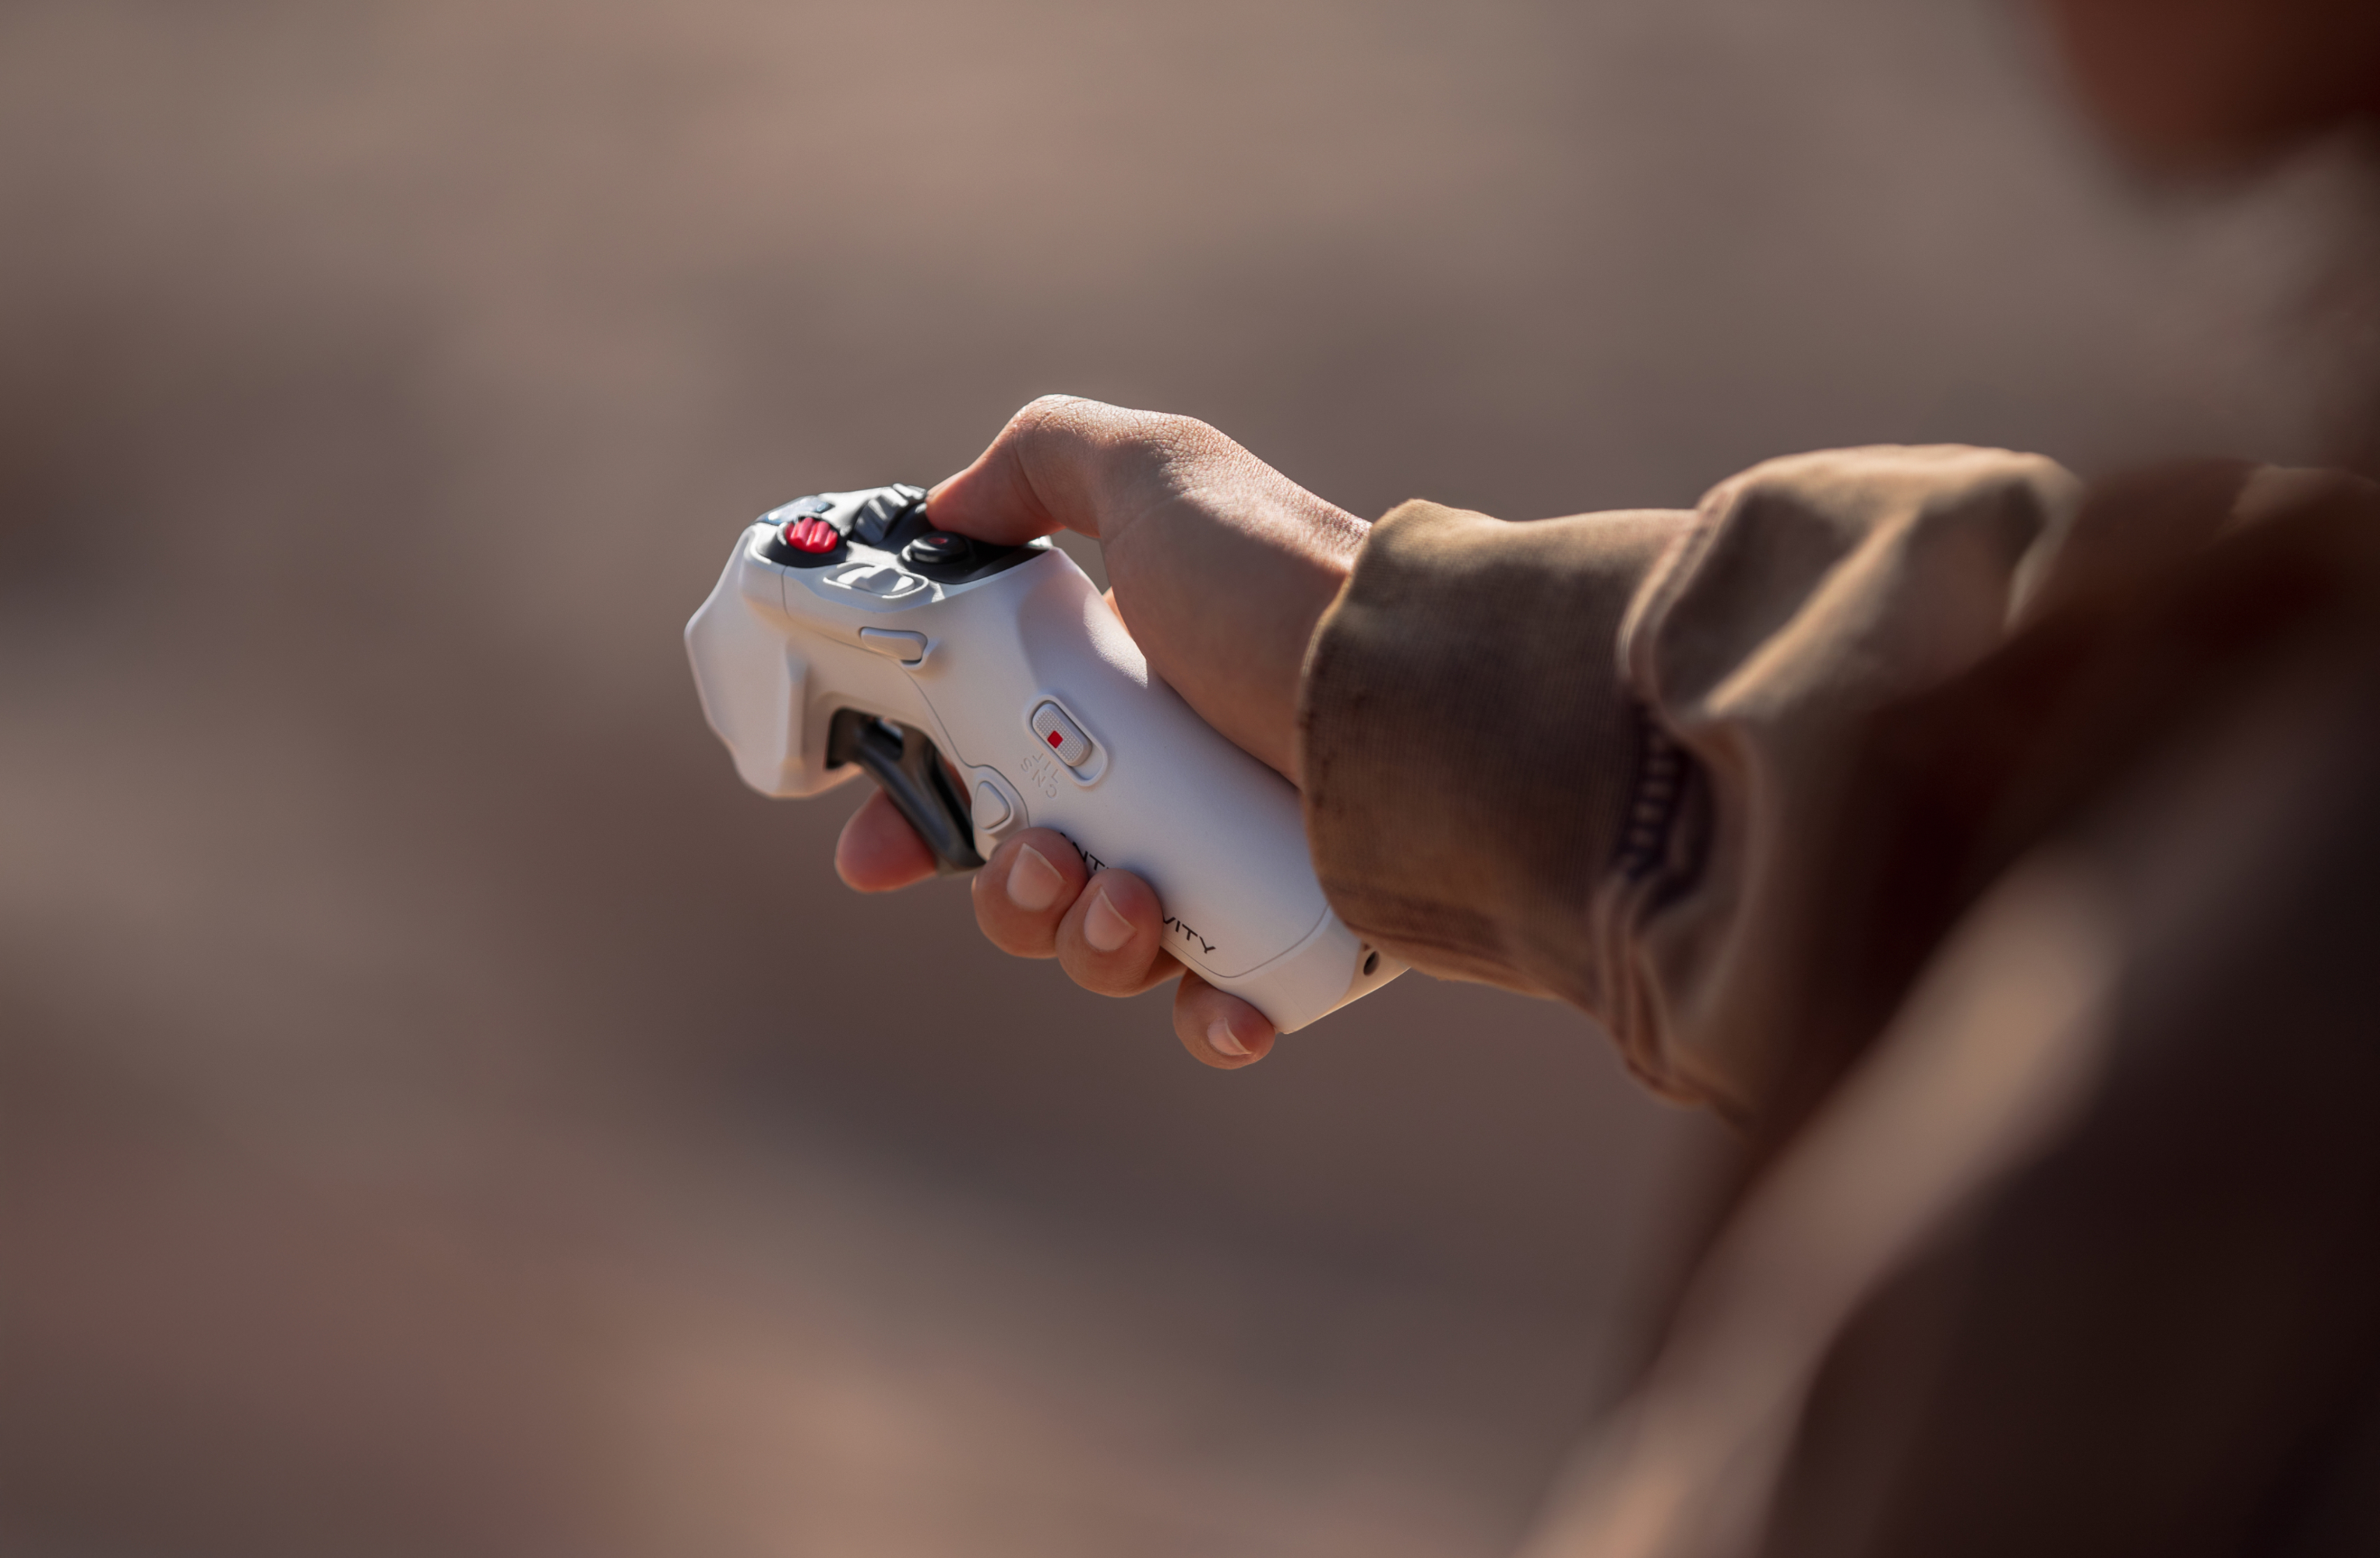
If you’re used to flying drones with the traditional gamepad-style controller with two sticks, the Antigravity A1 takes the experience to a completely different place. The classic control scheme is traded out for a one-handed motion controller that’s reminiscent of one of the controllers used with most modern VR headsets like the Meta Quest 3. It is the definition of simple, because you literally just point the controller in a direction, pull the trigger, and the A1 goes that way. That can be east or west, north or south, up or down, or anything in between. You don’t have to be looking in that direction, just pointing to it. It’s also worth noting, directions are also relative, so you don’t need to physically point the controller to the north to go that direct, you just need to point to whatever the goggles would let you think of as north.
DJI made something very similar to this motion controller to use with the original DJI FPV and Avata drones, but it flies very differently. The big difference is that DJI’s version is still based on the idea that the drone is facing and flying forward, which means you need to have the concept of turning. This is done by simply tilting the controller to the left or right as you fly forward. It’s profoundly intuitive and simple to grasp.
However, that concept of turning doesn’t really need to exist with a 360 camera and the ability to fly in any direction. It took several minutes for my brain to wrap around the Antigravity flight control, because I kept trying to tilt or turn the controller to the left or right as I flew, and while it did vaguely go a couple directions, it wasn’t just turning. I was trying to change the drone’s orientation like I’ve always done, but in reality it was me that needed to change my thinking — and sometimes the direction I’m facing.
That sounds like a navel-gazing deep thought, but it’s actually true. Once I realized that the drone never has to be oriented in any particular direction, I realized the easiest way to fly in a direction was to physically turn myself. It suddenly opened me up to make much more complicated operations. In fact, while there is a spinner on the motion controller for turning the actual orientation of the drone (and your viewport), I found I almost never used it because I could simply turn myself around much faster. But the spinner is kinda necessary if you’re sitting.
The A1 in Detail
I will be posting a thorough review soon, but in the meantime, let’s talk about some specs. I’m not going to repeat every posted spec here, but focus instead on the ones that matter.
Flight specs
Most of the physical details are probably going to seem fairly unremarkable, and not too dissimilar to the Mini line from DJI. And on that note, the A1 is a very small drone, so it would be very easy to pack up and carry around if it didn’t need to also travel with the goggles, controller, and batteries.
- Size
- Folded: 141.3 × 96.2 × 81.4 mm (5.56 × 3.79 × 3.20 in) (L×W×H)
- Unfolded: 308.6 × 382.3 × 89.2 mm (12.15 × 15.05 × 3.51 in) (L×W×H)
- Takeoff weight
- 249g (Standard Flight Battery)
- 291g (High-Capacity Battery)
- Max flight time
- 24 minutes (Standard Flight Battery)
- 39 minutes (High-Capacity Battery)
- Max Horizontal Speed
- 16 m/s (35.8 mph) (Sport Mode)
- 12 m/s (26.8 mph) (Normal Mode)
- 3 m/s (6.7 mph) (Cinematic Mode)
It’s notable that takeoff weight with a standard battery is 249g. For those of us in the US, that’s specifically aimed to come in just under the 250g weight limit where a drone requires registration with the FAA. (Check drone-laws.com for the laws in other countries.) I assume the battery was given as much capacity as possible without going over that weight limit. The unfortunate trade-off is that the max flight time is 24 minutes. That sounds reasonable at a glance, but it’s important to remember that you’ll be spending a portion of battery power during pre-flight and takeoff, and then the drone will want a sizable buffer to return home and make a safe landing. In practice, that 24 minutes will turn into about 15 minutes or so of actual flight.
The high-capacity battery adds 42g to the total takeoff weight, but you also get a much longer 39 minutes of flight time. Again, that has to be reduced for practical flight time, but it still works out to be around 30 minutes. In my opinion, it’s well worth the $5 registration fee (and affixing a label to the side of the drone) so you can legally use higher capacity and double your useful flight time.
After my first few flights, I also want to briefly comment on flight speed. The numbers don’t look half bad with Sport Mode giving you up to 16 meters per second, which even matches the top speed of the DJI Flip I reviewed earlier this year. New drone pilots will find this works perfectly well, but if you’ve flown many drones in the past, this may feel a bit sluggish.
Camera specs
The image sensor, just based on size, looks suspiciously likely to be the same used in the Insta360 X5. Both are 1/1.28-inch, which is the largest sensor I’m aware of on a consumer 360 camera. However, the lens aperture is slightly narrower on the Antigravity A1, which makes sense because a drone will generally want more of a scene to be in focus.
There’s a longer discussion to be had about resolution, and I’ll cover it more in my review, but I think it’s worth highlighting what 8K actually means here. It is true that the A1 can capture up to 8K resolution, but that doesn’t mean you’re getting incredibly high-resolution shots in the way you might expect.
- Image Sensor
- 1/1.28-inch
- Lens Aperture
- f/2.2
- Video Resolution
- 8K: 7680×3840 @ 30/25/24fps
- 5.2K: 5248×2624 @ 60/50/30/25/24fps
- 4K: 3840×1920 @ 100/30/25/24fps
- 4K Slow Motion: 3840x1920 @ 30/25/24fps
- Photo Resolution
- 55MP (10496×5248)
- 14MP (5248×2624)
- Video Encoding
- H.264 or H.265 at up to 170Mbps
With traditional drones shooting in 4K, the camera is only capturing a specific field of view in a specific direction and packing that data into 4K of pixels. Compare that with a 360 camera, where each sensor is capturing half of the entire visual sphere around the drone, and the two sensors combined make up that 8K of space.
More importantly, when it comes to framing your shots in post, a large percentage of those pixels won’t make it into the final shot. As a result, the final image is likely made up of 2K resolution, or possibly less. That’s still good, but it’s obviously far from the pristinely sharp resolutions some people imagine.
One more thing I have to call out is the lack of color profiles. None are listed in the specs, and as far as I’ve seen while using the A1, I can’t find a selector to switch between them. I would have liked to see i-Log, or at least a flat profile, just to squeeze a little more dynamic range out of shots in . What we have instead is more like a “Standard” profile that seems to lean just a little bit into “Vivid” for some greens and blues.
In fairness, Insta360 only introduced i-Log relatively recently with the Ace Pro 2 and X5, and didn’t even include it in the more recent X4 Air. It’s also possible Antigravity won’t be borrowing color profiles from Insta360 at all. On the other hand, for anybody that really cares about color grading and post production, it’s a disappointment that a drone with the starting price of the A1 doesn’t have even a basic flat profile.
And the Price
There’s no point beating around the bush, the A1 is a new type of drone from a new company, and it’s solving problems in new ways. It’s also making use of a 360 camera technology, which happens to be the most expensive among the action camera field. I don’t think it comes as a surprise that the A1 won’t be a low-cost camera drone. Kits start at $1,599 and go up to $1,999. And while those packages contain everything you’ll need, there may be a couple accessories worth looking into as well.
- Standard Bundle: $1,599
- Explorer Bundle: $1,899
- Infinity Bundle: $1,999
The Standard Bundle includes all of the necessary components to fly, including the A1 drone, goggles with battery pack and neck lanyard, a motion controller, and a standard flight battery. It also includes a semi-hard case for the drone itself, plus four replacement propellers. Be aware that this case is only for the drone, not for the goggles, motion controller, or other accessories. And just to highlight it again, this comes with the standard flight battery, and only one, so it won’t amount to much more than about 15 minutes of flight time per session.
The Explorer Bundle includes everything from the Standard Bundle, but it adds a charging hub and raises the total battery count to three (still with standard flight batteries), adds a sling case to carry everything, and raises the total propellers to eight.
And finally, the Infinity Bundle is basically identical to the Explorer Bundle, but upgrades all three batteries to the High-Capacity models and adds a microSD reader. It’s worth noting that the standard flight batteries are regularly priced at $99.99, and the high-capacity batteries are $149.99, so this bundle is effectively saving about $50 (plus whatever the card reader is valued at). Frankly, if you can afford it, and don’t mind the minor inconveniences of being over the 250g weight threshold, it’s well worth it to pick this package.
I don’t know if the Antigravity A1 will be appearing on store shelves quite yet, but it is available to order from the company’s Antigravity store, or through Adorama and B&H.
Disclosure: This post contains affiliate links; I may earn a commission at no extra cost to you if you purchase.